PreSale:
Effectus 2024 Tool for Outsourcing and Sales Optimization


Why is PreSale the tool that enhances the sales pipeline? When it comes to the sales process, there’s much more to it than what we actually see.
Artificial Intelligence (AI) has taken center stage, enabling machines and software to perform tasks that require human intelligence, such as visual perception, speech recognition, decision-making, and natural language processing. As organizations increasingly adopt AI to automate processes and build smarter digital products, partnering with experienced providers of AI Software Development Services can help transform innovative ideas into scalable, real-world solutions.
It involves recollecting, analyzing, and making strategic decisions based on specific data. So, are you ready to navigate this tool?
A PreSale overview
PreSale works as a tool to enhance and optimize the Sales process. It allows the potential client to schedule a meeting and complete a set of questions to facilitate the sales pipeline.
Additionally, both sides, the lead and sales team, receive a document with all the information provided and, with the possibility of adding a signed NDA.
Not only did Effectus create its own tool, but it has also developed a white-label solution that enables potential admins to customize branding and surveys.
To add, the technologies chosen by our engineers team to build the app were React and Nest.js, hand-in-hand with our UX/UI team which rocked designs in Figma.
To start with, among best practices, clear, well-communicated documentation is a must. So, that’s why it’s one of the aspects PreSales pays crucial attention to.
Therefore, PreSale brings documentation to a whole new level.
Let’s dig in
First, the lead provides basic information such as email, name, and company name.
Then, it opts for scheduling a meeting with Effectus CEO and Sales team or continuing with the process without scheduling it.
What’s next?
Time to choose your fit: either Augmentation or End-to-end services.
Afterward, it follows a series of questions that recall product features and identify what the lead wants to develop. Its main sections are:
End-to-end
- General questions about the product
- Partners and customers
- Possible features
- Financial aspects
- Resources and skills
Augmentation
- Top talent selection
- Skills and experience
- On demand
- Outsourcing
- Technical aspects
- Financial aspects
- General questions
PreSale: how to use it
On the one hand, we need to define how to use the tool. Even though you can intuitively use it and learn, a bit of help always comes in handy.
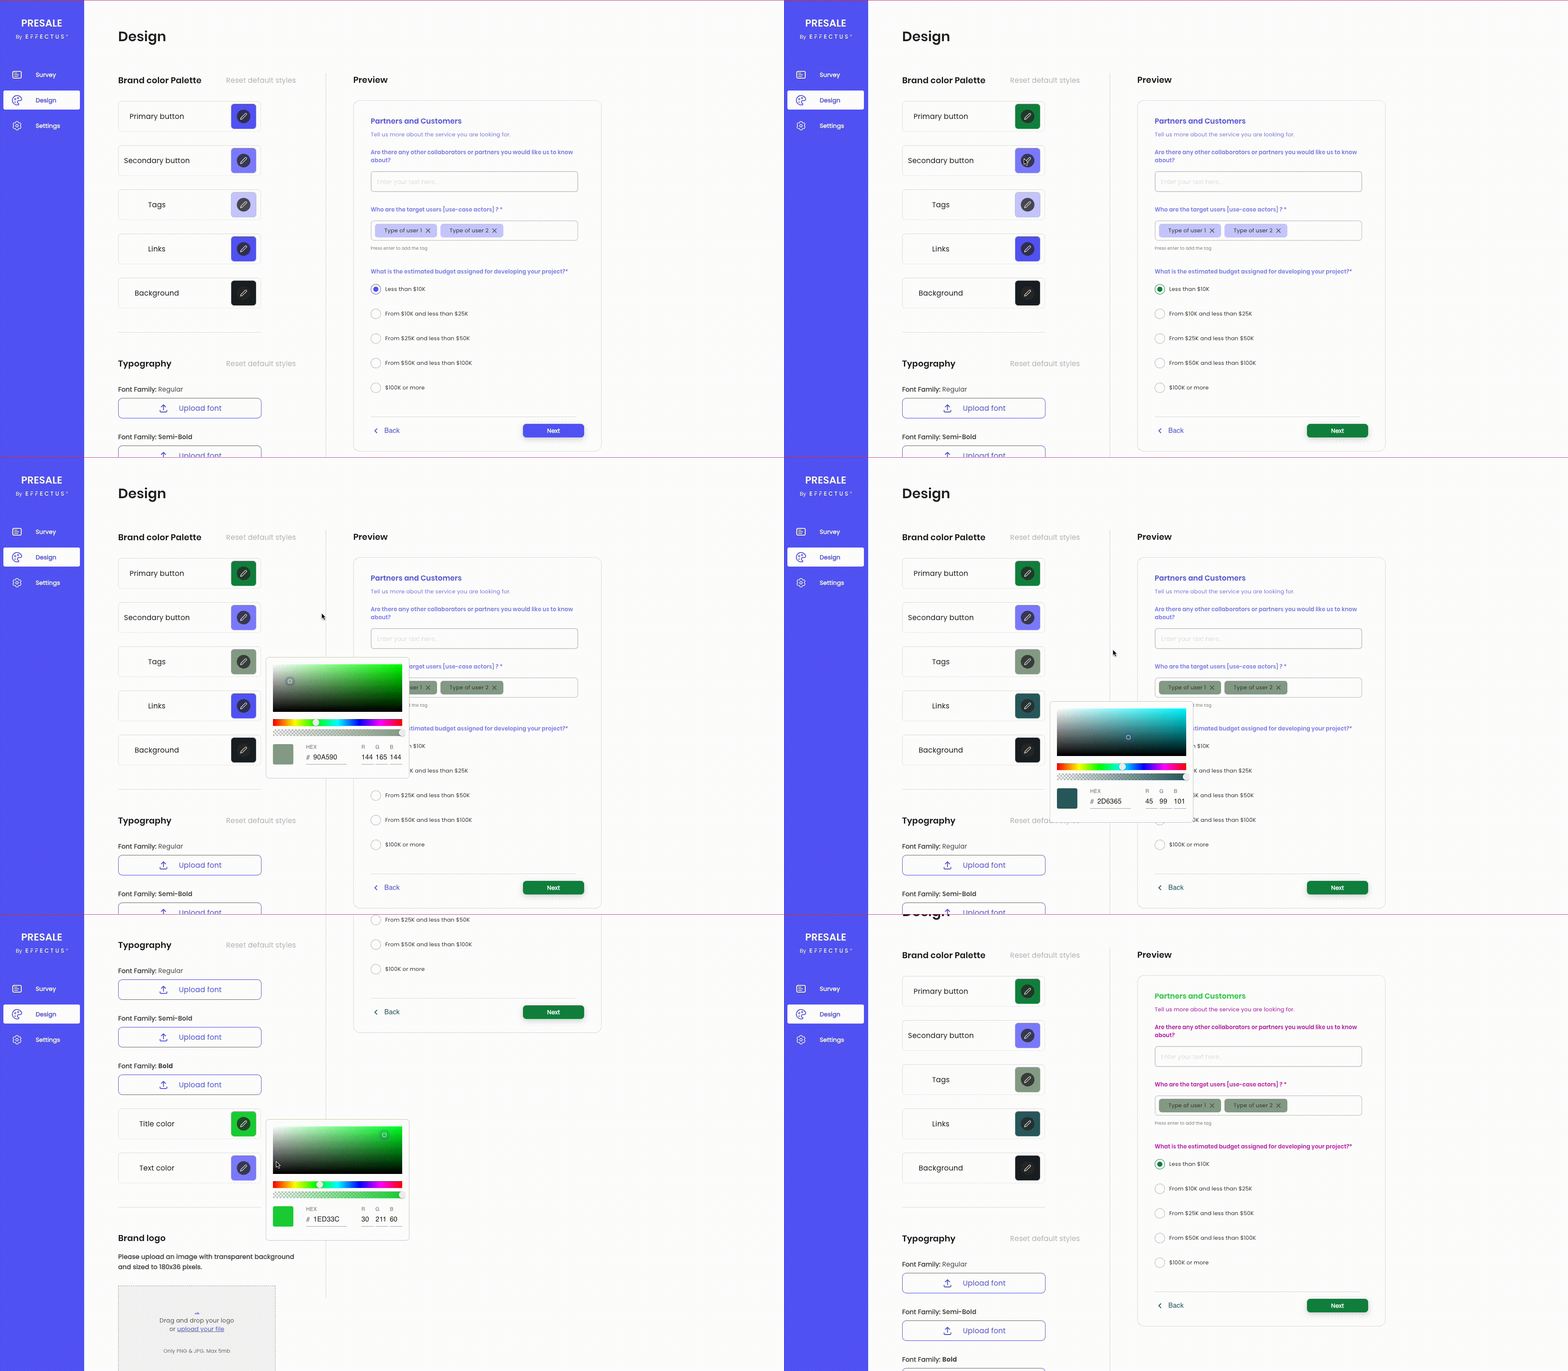
There are two sides to it: as an admin or as a potential client. Firstly, as an admin, you’ll need to set your company’s branding.
Moreover, we follow a WYGIWYS model so as to make it easier for everyone.
Keep on going
After you have saved the settings, you can create the question groups, including the main questions with different question types:
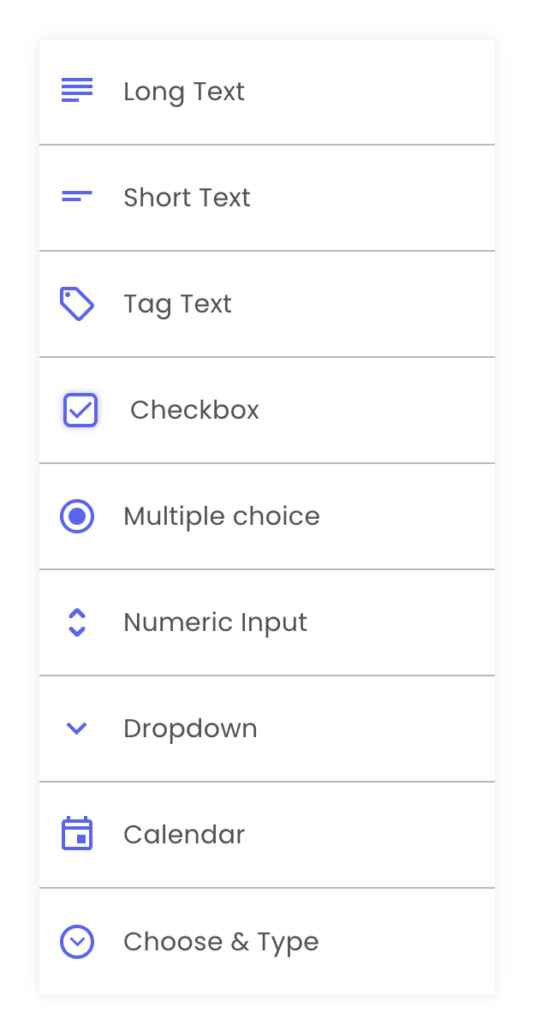
To conclude, these features enable you to create and organize your question groups and choose the type of answer you want.
One benefit we can’t overlook is that creating the tool allows you to think strategically about which data you want to collect.
So, get ready to hop on the analytics!

Let’s talk about how this tool allows you to boost sales. Here’s how:
- Qualifying Leads: PreSale helps to qualify leads more effectively by automating lead scoring based on predefined criteria. This allows the sales team to focus its efforts on leads that will convert into customers.
- Lead Nurturing: PreSale enables automated lead nurturing through personalized email campaigns, follow-up sequences, and targeted messaging based on prospect behavior and engagement. This keeps leads engaged and moving through the sales funnel until making a purchase decision.
- Customized Presentations: You can create customized presentations and proposals tailored to each prospect’s specific needs and preferences. This not only demonstrates your understanding of the prospect’s requirements but also increases the likelihood of closing the deal.
- Automated Scheduling: PreSale includes features for automating sales meetings, demos, and consultations. This eliminates the back-and-forth communication typically associated with scheduling appointments, saving time for both the sales team and the prospect.
- Data-driven Insights: PreSale provides valuable data and insights into prospect behavior, engagement metrics, and sales performance. Analyzing this data allows you to identify trends, optimize your sales process, and make informed decisions to improve sales outcomes.
Possible integrations
- Integration with CRM: PreSale can be integrated with Customer Relationship Management (CRM) systems. This ensures consistency and alignment across the sales team.
- Predictive Analytics: leverage predictive analytics to forecast future sales opportunities, identify potential bottlenecks in the sales process, and recommend actions to improve conversion rates. This helps prioritize sales efforts and allocate resources effectively.
Must-do!
- Improved Communication: PreSale facilitates better communication and collaboration among sales team members through features such as shared calendars, task assignments, and real-time messaging. This fosters a more cohesive and coordinated approach to selling.
Overall, implementing PreSale for your software boutique can lead to increased efficiency, higher conversion rates, and improved sales performance.
Let’s don the Engineer lens
Effectus, one of its pillars, focuses on collaboration and building bridges within the community. We’ll share some features and the process we’ve followed to create them.
In particular, we’ll delve into how to interact with the white-label and branding design settings on the white-label end and how to create question groups and types on the Effectus end.
Survey customization feature: Allows administrators to define their preferred survey color schemes. Thanks to our top Engineer Agustina Martinez and Francisco Decurnex for the code:
Design Page :
const Design = () => {
  const { branding } = useAppSelector((state) => state.companySlice);

  const [colorsArray, setColorsArray] = useState(colorPaletteOptions(branding));
  const [typographyArray, setTypographyArray] = useState(
    typographyOptions(branding)
  );

  useEffect(() => {
    setColorsArray(colorPaletteOptions(branding));
    setTypographyArray(typographyOptions(branding));
  }, [branding]);

  const [showPrimaryColorBox, setShowPrimaryColorBox] = useState(false);
  const [showSecondaryColorBox, setShowSecondaryColorBox] = useState(false);
  const [showTagsColorBox, setShowTagsColorBox] = useState(false);
  const [showLinksColorBox, setShowLinksColorBox] = useState(false);
  const [showTitleColorBox, setShowTitleColorBox] = useState(false);
  const [showTextColorBox, setShowTextColorBox] = useState(false);
  const [showBackgroundColorBox, setShowBackgroundColorBox] = useState(false);

  const colorStates = [
    showPrimaryColorBox,
    showSecondaryColorBox,
    showTagsColorBox,
    showLinksColorBox,
    showBackgroundColorBox,
  ];

  const colorSetters = [
    setShowPrimaryColorBox,
    setShowSecondaryColorBox,
    setShowTagsColorBox,
    setShowLinksColorBox,
    setShowBackgroundColorBox,
  ];

  const typographyStates = [showTitleColorBox, showTextColorBox];
  const typographySetters = [setShowTitleColorBox, setShowTextColorBox];

  const handleContainerClick = (event: React.MouseEvent) => {
    const target = event.target as HTMLElement;

    colorsArray.forEach((option, index) => {
      const { buttonClassname, className } = option;

      if (
        colorStates[index] &&
        !target.closest(`.${className}`) &&
        !target.closest(`.${buttonClassname}`)
      ) {
        colorSetters[index](false);
      }
    });

    typographyArray.forEach((option, index) => {
      const { buttonClassname, className } = option;

      if (
        typographyStates[index] &&
        !target.closest(`.${className}`) &&
        !target.closest(`.${buttonClassname}`)
      ) {
        typographySetters[index](false);
      }
    });
  };

  return (
    <PageWrapper>
      <Title>{DESIGN}</Title>
      <Container onClick={handleContainerClick}>
        <LeftContainer>
          <ColorPalette
            colorSetters={colorSetters}
            colorStates={colorStates}
            colorsArray={colorsArray}
          />
          <Line />
          <Typography
            typographySetters={typographySetters}
            typographyStates={typographyStates}
            typographyArray={typographyArray}
          />
          <Line />
          <BrandLogo />
        </LeftContainer>
        <VerticalLine orientation="vertical" />
        <RightContainer>
          <Preview
            primaryColor={colorsArray[0].selectedColor}
            tagColor={colorsArray[2].selectedColor}
            linkColor={colorsArray[3].selectedColor}
            titleColor={typographyArray[0].selectedColor}
            subtitleColor={typographyArray[1].selectedColor}
          />
        </RightContainer>
      </Container>
    </PageWrapper>
  );
};

export default Design;
Color Palette Component :
const ColorPalette = ({
  colorSetters,
  colorStates,
  colorsArray,
}: ColorPaletteProps) => {
  const dispatch = useAppDispatch();
  const [resetDefaultStyles, setResetDefaultStyles] = useState(false);

  const updateBrandingColor = async (index: number, newColor: string) => {
    const propertyNames = [
      "primaryColor",
      "secondaryColor",
      "tagColor",
      "linkColor",
      "backgroundColor",
    ];

    const bodyData: BodyData = {
      [propertyNames[index]]: newColor,
    };

    const updatedBranding = await updateBranding(bodyData);
    dispatch(setBranding(updatedBranding));
  };

  const handleReset = async () => {
    setResetDefaultStyles(true);

    const updatedBranding = await updateBranding({
      primaryColor: colorsArray[0].defaultColor,
      secondaryColor: colorsArray[1].defaultColor,
      tagColor: colorsArray[2].defaultColor,
      linkColor: colorsArray[3].defaultColor,
      backgroundColor: colorsArray[4].defaultColor,
    });
    dispatch(setBranding(updatedBranding));
  };

  return (
    <ColorContainer>
      <TopContainer>
        <Subtitle>{COLOR_PALETTE}</Subtitle>
        <ResetButton onClick={handleReset}>{RESET_STYLES}</ResetButton>
      </TopContainer>
      <ColorPaletteContainer>
        {colorsArray.map((option, index) => (
          <ColorPicker
            key={index}
            {...option}
            showColorBox={colorStates[index]}
            setShowColorBox={colorSetters[index]}
            resetDefaultStyles={resetDefaultStyles}
            setResetDefaultStyles={setResetDefaultStyles}
            updateBrandingColor={(newColor: string) =>
              updateBrandingColor(index, newColor)
            }
          />
        ))}
      </ColorPaletteContainer>
    </ColorContainer>
  );
};

export default ColorPalette;
Preview Component :
const Preview = ({
  primaryColor,
  tagColor,
  linkColor,
  titleColor,
  subtitleColor,
}: PreviewProps) => {
  const { semiBoldFontFile, regularFontFile } = useAppSelector(
    (state) => state.companySlice.branding
  );

  return (
    <PreviewContainer>
      <TopContainer>
        <PreviewTitle>{PREVIEW}</PreviewTitle>
      </TopContainer>
      <Container>
        <QuestionsContainer>
          <Title fontFamily={semiBoldFontFile} color={titleColor}>
            {PARTNERS}
          </Title>
          <Subtitle fontFamily={regularFontFile} color={subtitleColor}>
            {ABOUT_SERVICE}
          </Subtitle>
          <InputContainer>
            <Question fontFamily={semiBoldFontFile} color={subtitleColor}>
              {COLLABORATORS}
            </Question>
            <TextInput
              fontFamily={regularFontFile}
              placeholder={ENTER_YOUR_TEXT_HERE}
              disabled
              preview
              showErrorLabel={false}
            />
          </InputContainer>
          <PreviewTag tagColor={tagColor} subtitleColor={subtitleColor} />
          <PreviewRadioButton
            primaryColor={primaryColor}
            subtitleColor={subtitleColor}
          />
          <Line />
          <BottomContainer>
            <IconContainer>
              <ArrowIcon fill={linkColor} />
              <TextLink fontFamily={regularFontFile} color={linkColor}>
                {BACK}
              </TextLink>
            </IconContainer>
            <Button
              label={NEXT}
              variantType="primary"
              disabled
              width={144}
              height={32}
              borderRadius={8}
              color={primaryColor}
              fontFamily={regularFontFile}
            />
          </BottomContainer>
        </QuestionsContainer>
      </Container>
    </PreviewContainer>
  );
};

export default Preview;
Let’s call it a day!
It’s crucial for Sales teams and organizations to stay up-to-date with latest frameworks and be part of a robust community. People have something to teach.
Stay tuned, and don’t forget to check out our other posts for more insights on sales, methodologies, code improvement and tips!
Related articles

Oct 17, 2024 | 3 min read
2024 upped the game: AI in Effectus PreSale App

Jul 29, 2026 | 4 min read
From Ideas to Innovation: How AI Development Partners Accelerate Business Transformation

Jul 27, 2026 | 5 min read